
Welcome to OmegaT, a computer-assisted translation (CAT) tool that offers great flexibility, performance and robustness, as well as features beyond those of commercial offerings, even for beginning translators.
An OmegaT translation project consists of a number of resources
stored in separate folders, of an
omegat.project
file that stores the location of all the resources and of a
project_save.tmx
translation memory file that stores all the translations made while
working on that project.
Translators can easily modify the contents or location of those resources at any time during the translation.
By default, resources include the project’s translation memory, which is automatically created upon project creation, and the files to translate. They can also include reference translation memories, glossaries, and other reference files.
See the Project Folder chapter for details.
Translators do not have to create a translation memory or associate one to a new project. OmegaT takes care of that automatically .
Translators can very easily reuse an existing projectʼs translation memory by simply adding new translation files to an existing project, or by copying an existing translation memory to a new project.
There is no limit to the number of translation memories that can be used as reference in a translation project, and OmegaT makes it very easy to assign different levels of priority to these additional memories.
See the Use translation memories how-to for details.
Simple settings enable translators to easily share resources and work together on a project.
The team functionality offers industrial grade robustness and the flexibility to synchronize project resources among team members, while allowing easy resolution of conflicts between different translations.
See the Share TMs how-to for details.
OmegaT is designed not only to facilitate the translation process, but also to ensure the translator does not have to worry about losing data.
You have not used OmegaT yet, but you remember the times you were translating in your word processor and a computer glitch wiped out the book translation you had been working on for the last six months, or the report that was due in one hour.
You're considering OmegaT, but…
How can OmegaT help against such glitches?
Not to worry. The robust design of OmegaT makes it extremely unlikely that you have lost more than a few minutes of work.
Even if things look very broken, do not panic. Just follow the simple steps described in the Troubleshoot issues how-to.
And before you ever need to follow those steps, OmegaT will allow you to focus on actually translating, and hopefully help you become a better translator.
If you need assistance with any aspect of OmegaT, feel free to join the OmegaT user groups.
This section presents the conventions used to distinguish the elements of the OmegaT user interface in this manual. They are displayed in a way that makes it easier to identify their function. The action associated with an item also hints at its function in case the display fails to convey the visual differences: use a menu item, or click on a button.
Similarly, links to the various parts of the manual are displayed in a way that make it easier to identify the function of the linked item.
Use C + S + N .
The Editor pane.
The
omegat.project
file.
The Font preference.
The Project Folder chapter.
To avoid duplicating shortcut descriptions, we use single letters as a common identifier for modifiers. See the Menus chapter for details.
On Windows and Linux: Control + E
On macOS: Command + E
In this manual: C + E
If you have not yet installed OmegaT, see the Install OmegaT how-to.
To learn how to launch OmegaT, see the Run OmegaT how-to.
To start using OmegaT, you first have to create a project to hold all your files.
Use C + S + N , and select an empty folder or create a new one with the name of your project.
An OmegaT project is simply a set of folders that holds all your default resources.
The Project Properties dialog opens after you have named your project.
In that dialog, select or enter the languages of your source and translated files, set the various options, and click on to continue.
OmegaT provides a convenient short list of two-letter language codes, but you can type any code that conforms to BCP-47 (including the three-letter language codes) into the appropriate field.
Make sure that you enter the correct languages and that all other locations requiring a language code match the code you assign here. See the Languages section for details.
Use C + E to come back to this dialog after you have created the project,.
You can modify the structure of a project at any time after you have started translating. In the dialog, just tell OmegaT what new resource folders to use. It will then just ask you to reload the project and start using the new locations.
The Source Files dialog opens next.
Click on or and add source files.
Use if you don’t remember where your project is.
If you do not see the contents of a file in the Editor pane, that file might be empty, or in a format that is not supported by OmegaT. Use to open the list of supported file formats. If the format of your file is not listed, use third-party plugins or convert the file to a format that is supported. See the Support other formats how-to for details.
Omegat provides a spellchecking system, but does not come with the dictionaries required to actually spellcheck your translations. You need to install the dictionaries you need yourself.
Use the Spellchecker section in the general Preferences dialog to access the spellchecking preferences.
Click on the button to display a list of dictionaries available at the URL in the URL of downloadable spellchecking dictionaries field above that button.
Select as many dictionaries as you want and click the button. OmegaT will download them and copy them to the spellchecking dictionaries location specified at the top of the dialog (the configuration folder by default). This operation may take some time.
Click the button. OmegaT will display a list of the installed dictionaries.
OmegaT does not recognize languages automatically, and only uses a dictionary if its name matches the target language code.
If the project target language is fr and the dictionary name is fr_fr or fr-fr , you can either:
use C + E to change the project target language to fr-fr , or
use to access the configuration folder and change the dictionary file names to fr .
The default setting for a translation project is to create
sentences
by splitting the
paragraph
blocks
found in the document. See the
Sentence-level
        segmenting
project
property for details.
Segments within a paragraph can be further segmented, or "unsegmented" (merged). Add a segmentation rule to further segment them, or an exception rule to merge them with the part they were split from. See the Segmentation appendix for details.
The standard space character is often used as a segment boundary. You can follow the steps below to merge two text sections separated by a space character:
Find the location of that space.
Replace it with a non-breakable space.
Save the file.
Go back to OmegaT and use F5 to have OmegaT recognize the change.
Once all that is done, the source files appear in OmegaT in a layout that looks like this:
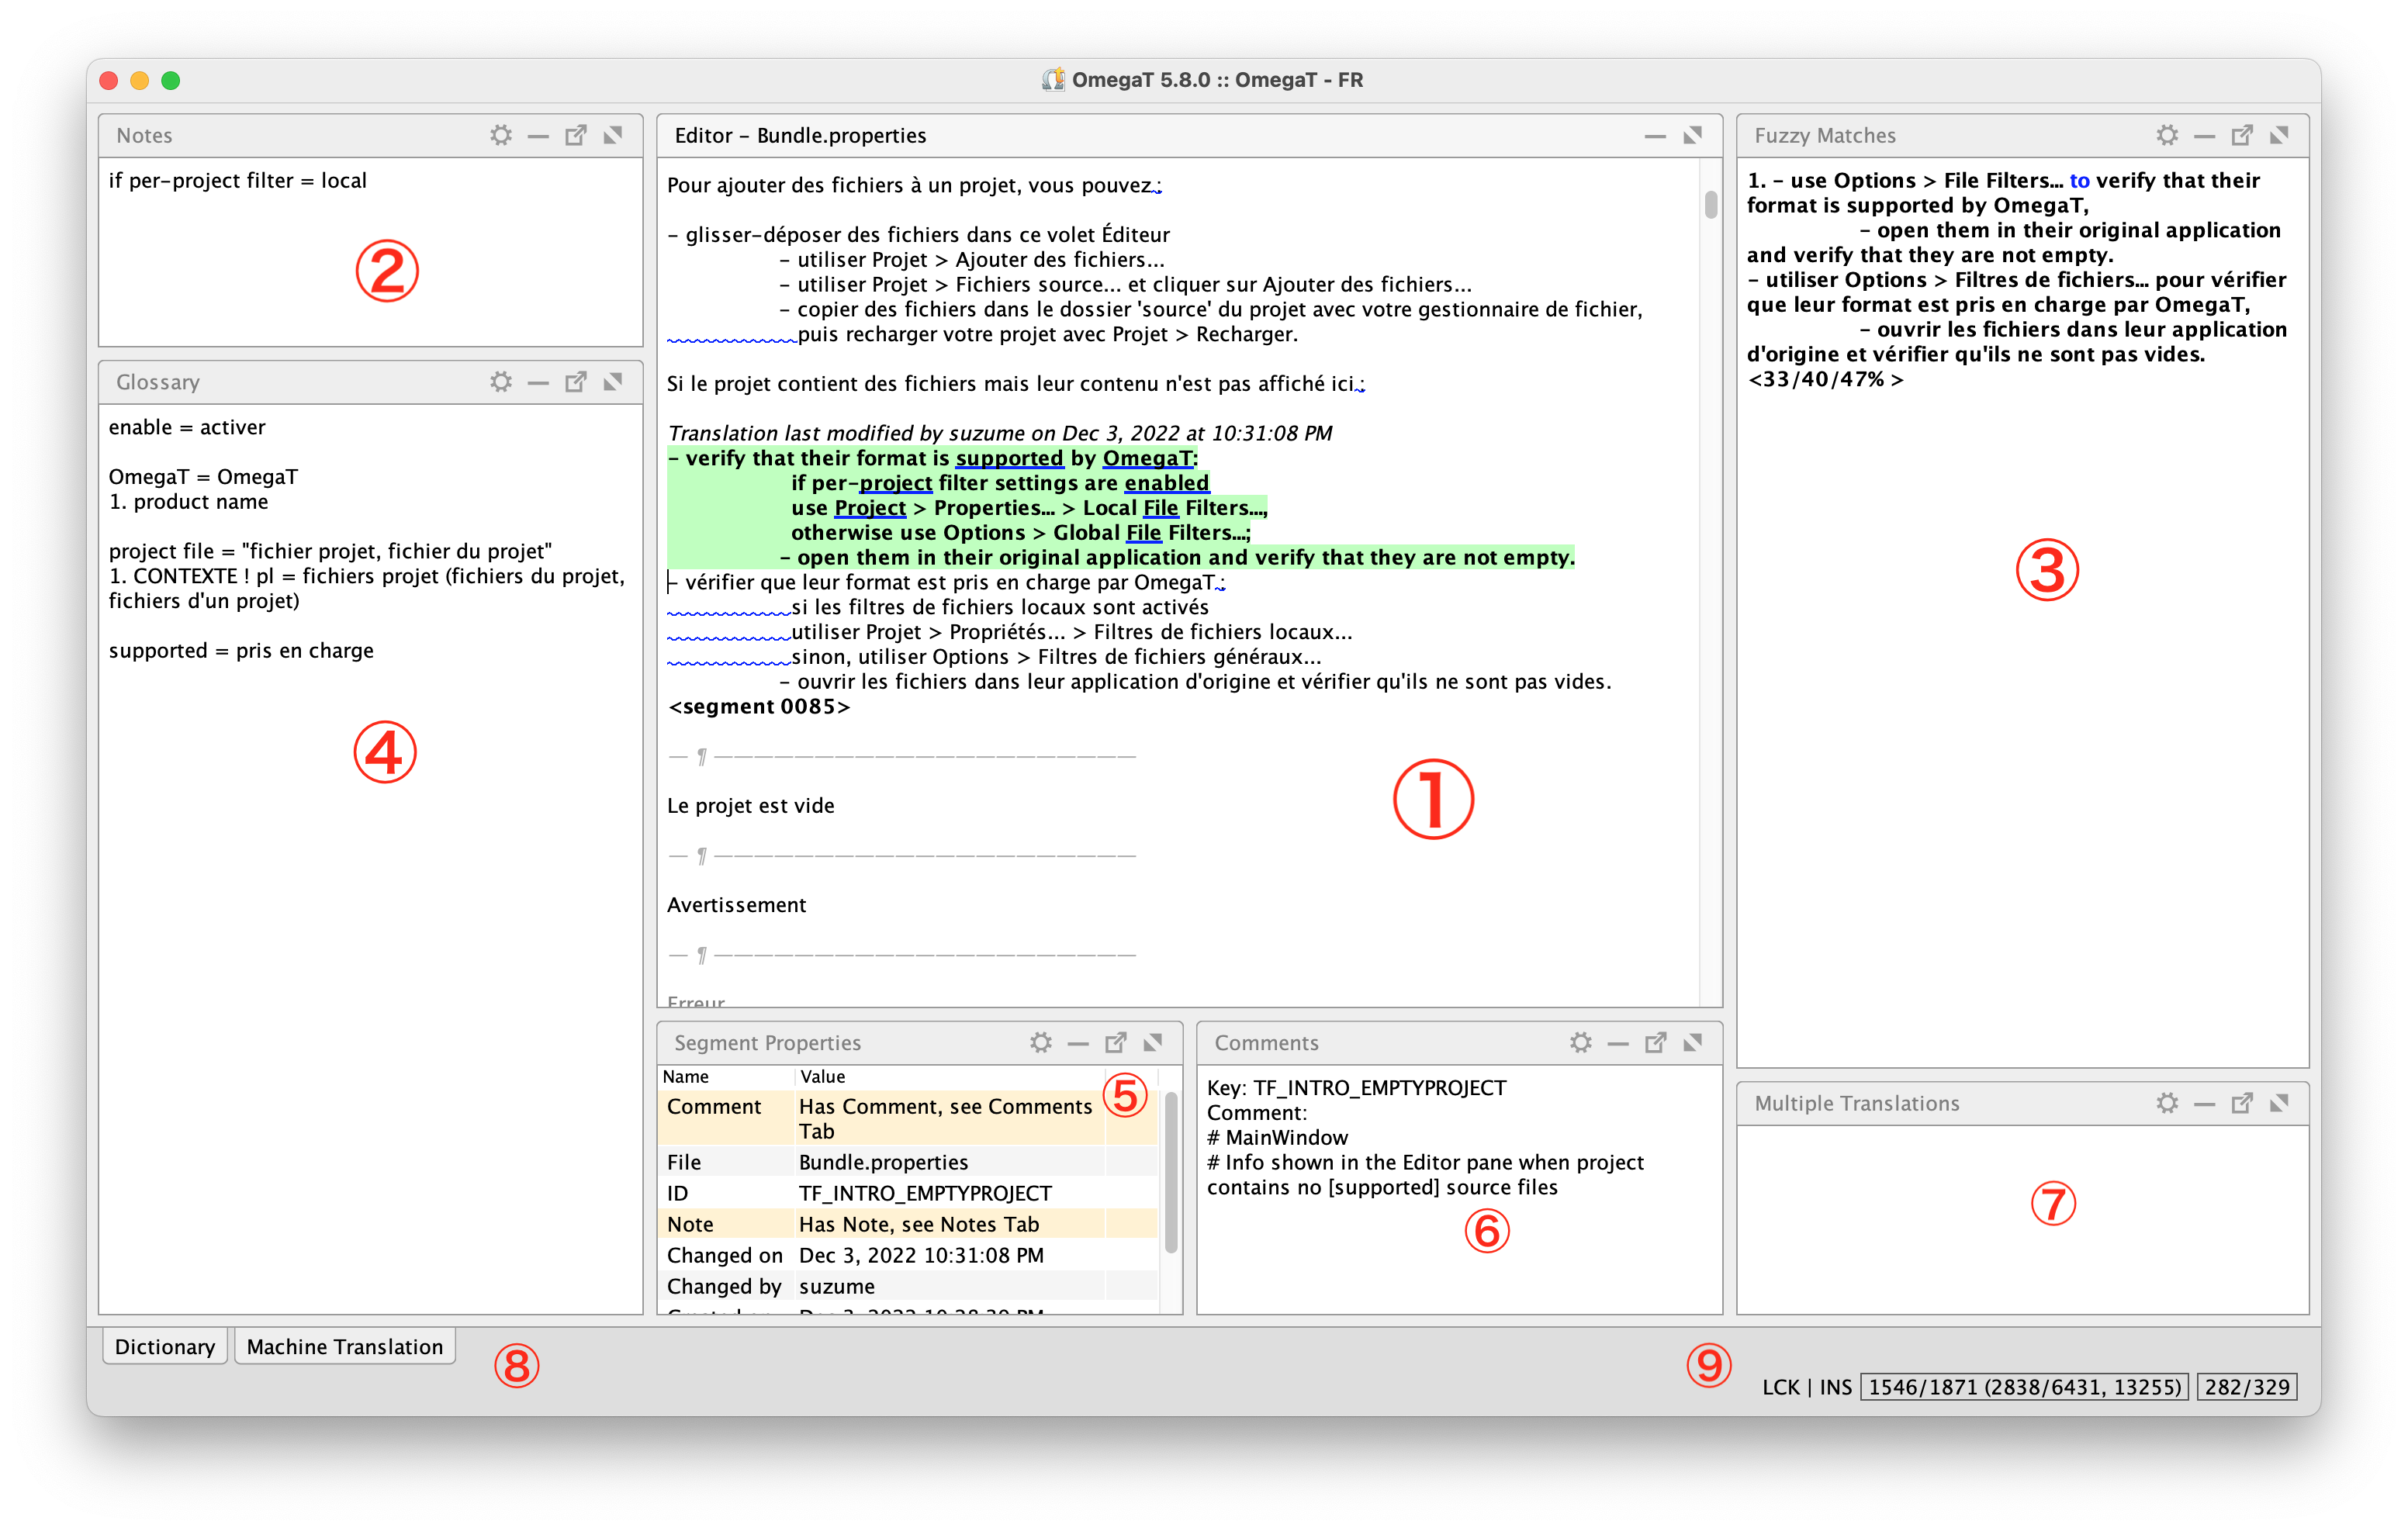
The Editor pane
The Notepad pane
The Fuzzy Matches pane
The Glossaries pane
The Segment properties pane
The Comments pane
The Multiple Translations pane
The Dictionaries and Machine Translations panes are docked
The Status bar (on the right), which contains project information
Use the various options in the menu and move the various panes around to obtain the layout that fits your workflow best.
The Editor pane is where you type your translation.
To see how efficient you can be with shortcuts, see the A shortcut based workflow section.
After you have typed the translation of a segment, use C + U to move to the next untranslated segment.
When you leave the segment, its translation is automatically stored into the project_save.tmx file and will be used as reference for the rest of your translation.
See the menu for more navigation options.
OmegaT does not assign different statuses to translated segments. Either a segment is translated, or it is not.
If you need a specific review process you can, for example:
Use C + S + G to add terms to your glossary.
Use and the Auto-Completion preferences to manage glossary matches.
When you enter a segment containing terms that match entries in your glossaries, those terms and their translations are displayed in the Glossaries pane.
When you enter a segment that matches part of the content of the project translation memories, OmegaT displays the matches in the Fuzzy Matches pane.
Use the menu to manage translation memory matches and perform other various useful functions.
The C + F function lets you search the entire project for terms, sentence fragments, and so on, using exact, keyword, or regular expression searches. You can also narrow the scope of the search based on information such as author or date.
You can also focus only on the results by filtering them in the Editor. See the Text Search section for details.
You can replace terms with the C + K function using a similar dialog. See the Text Replace section for details.
You can leave notes to yourself or team members in the Notepad pane while you translate, and go back to annotated segments with C + A + N or C + A + P in the menu, or from the Text Search window.
The Context menu gives easy access to various frequently used functions. The Auto-completion menu is also available in the Editor pane.
If the documents you translate use bold, italics, or other decorative elements, OmegaT will convert those elements into tags that enclose the decorated text. Such files include LibreOffice files, HTML files an Microsoft Office files for example. Documents often also contain tags that have nothing to do with decorations, but are nevertheless important in the source files (and, consequently, in the translated files).
A sentence might look like this in its original application:
OmegaT is an easy-to-use program for eager translators
Depending on the original format, OmegaT, however, will present this sentence in a fashion similar to this one:
OmegaT is an <t0/>easy to use<t1/> program for <t2/>eager<t3/>
translators
The various tag related settings can be very helpful to properly manage the tags in a documents. See the following options and scripts for details:
The tags in OmegaT are grayed, making them easy to recognize. They are protected to prevent you from modifying their contents, but you can delete them, enter them by hand or move them around in the target sentence.
Use C + S + T and C + T to insert the tags at the cursor location.
You can define custom tags that will be managed in the same
manner. See the
Custom
		tags
section for details.
You can also define strings that OmegaT should warn you
about if you leave them in a translation. See the
Flagged
		text
section for details.
If you make mistakes when you manage the tags, your translated files might fail to open. Use C + S + V to check your tags before you generate your translated files.
If a file refuses to open in LibreOffice, Word or other application, it is often due to errors in the management of OmegaT tags. Return to OmegaT, check your document for tag issues and recreate the translated file.
Feel free to modify the Panes layout and options when you review the translation.
Use the C + S + V option to perform various checks on the contents of your translation.
Whenever you want to see what your translation will look like in its final format, use C + D .
Any time you create the translated files, any previously created files with the same name are overwritten. Rename any files you want to prevent from being overwritten after you create them. You can automate file name changes using the Edit option for the file filter.
Your translations are always stored in the project_save.tmx file, which is the project translation memory, located in the omegat folder of your project.
Deleting the contents of the target folder never impacts the content of your translations.
The documents are created in the target folder of your project. Previously created files are overwritten by the process unless you have renamed them...
Once the translated files have been created, you can open them in their original application to check their contents and eventually further modify them. Such external modifications will not be reflected in OmegaT.
Modifications made outside OmegaT can be reinserted in OmegaT (and thus in the project translation memory, to keep it up to date) either by entering them manually in the relevant segments, or by aligning the original file and the final translated file to create a new translation memory (TMX) file that will be put in the tm/enforce folder of your project folder. See the Align Files section for details.
Translation projects are just folders containing files. You can create a new project for each new job, or you can add new source files to an existing project at any time.
You can access and modify the project settings using C + E . To see the list of files in the project, use C + L from the same menu. You can access the contents of all resources at any time with the option.
Every time you create the translated files (see Create the
translated files, above),
OmegaT creates three translation memories that contain the state of the
translation of the files currently in the source
folder. See the
Exported
		translation memories folder
section for details.
Remembering the main editing and navigation shortcuts (or modifying them to suit your needs) can help you streamline your work.
This is best illustrated with an example:
Picture yourself tasked with translating an updated version of a manual from a previous job. See the Reuse TMs how-to for details.
Since the first few pages have not changed, your are greeted with a screenful of already translated segments from the previous job's memory upon opening the project.
Rather than tediously scroll down until you find the first segment to translate, you quickly press C + U to jump straight into the action and start translating. (And do so again each time you reach a large unchanged section.)
A few segments later, you come across a term you should add to the glossary. Instead of reaching for the mouse, you unlock the cursor with F2 , use the cursor keys and standard system shortcuts to navigate to the term and select it, and then press C + S + G to call up the glossary entry dialog to enter the source term. You then switch back to the editor, lock the cursor again with F2 and repeat the process to enter the target term.
You have enabled the auto-completion to automatically display not only history predictions, but also glossary terms, and pre-defined short strings, which can be entered with simple arrow navigation.
You then reach a revised section of the text where the Fuzzy Matches pane shows a number of similar segments from the previous job.
After quickly tapping C + I to insert the match, you make the necessary changes to match the revised text.
This continues, with the occasional sequence of C + 2 (or other number) followed by C + I when one of the matches from 2 to 5 is more suitable.
Some segments will require further modification later on, so you use C + A + 9 to enter the Notepad pane, leave yourself a note and come back to the Editor pane with C + A + 0 .
By the time you get near the end of the section, you have also used C + R once or twice to replace already automatically entered fuzzy matches from the previous translation with better matches from earlier in the current section.
Later on, you come up with a better way to phrase a somewhat thorny expression that had come up earlier, so you select it in the source text, press C + F to find it, and then use C + J to immediately jump to that segment from the search dialog.
Since OmegaT has registered your navigation history, you only need to use C + S + J to immediately continue from where you left off.
You now decide to review the annotated segments. You use C + F to find them and, in the search window, use C + N and C + P to navigate the results. OmegaT synchronizes the Editor contents with the selected result, so you can edit the segments right away.
Time for a break. As you savour your coffee, you reflect on how much more smoothly you were able to use the various OmegaT functions compared to when you had just gotten started and spent a lot of time clicking through menus.
The smoother workfow, in turn, allowed you to better focus on the translation itself.
At the same time, you realize that during you session, you used the menu and the cursor keys several times, and decide to add a new shortcut to streamline that part of the process as well.
Taking the time to learn the shortcuts for the functions you use often will be well worth your while.